Simple tips to ride better!
At Cycling Heidi, we take cycling seriously… but never too seriously. 😉
Here you’ll find practical tips to improve your technique, ride more confidently, and better understand what really happens when you’re on a bike. Every guide here draws on techniques I teach out on the road, during my workshops and on group rides.
This page is a work in progress, much like a well-planned ride: it grows week by week. New tips will be added over the coming months, so don’t hesitate to come back for a look.
Want to be notified as soon as a new tip goes live? Join the newsletter and I’ll send you a heads-up the moment it’s published.
Group riding basics
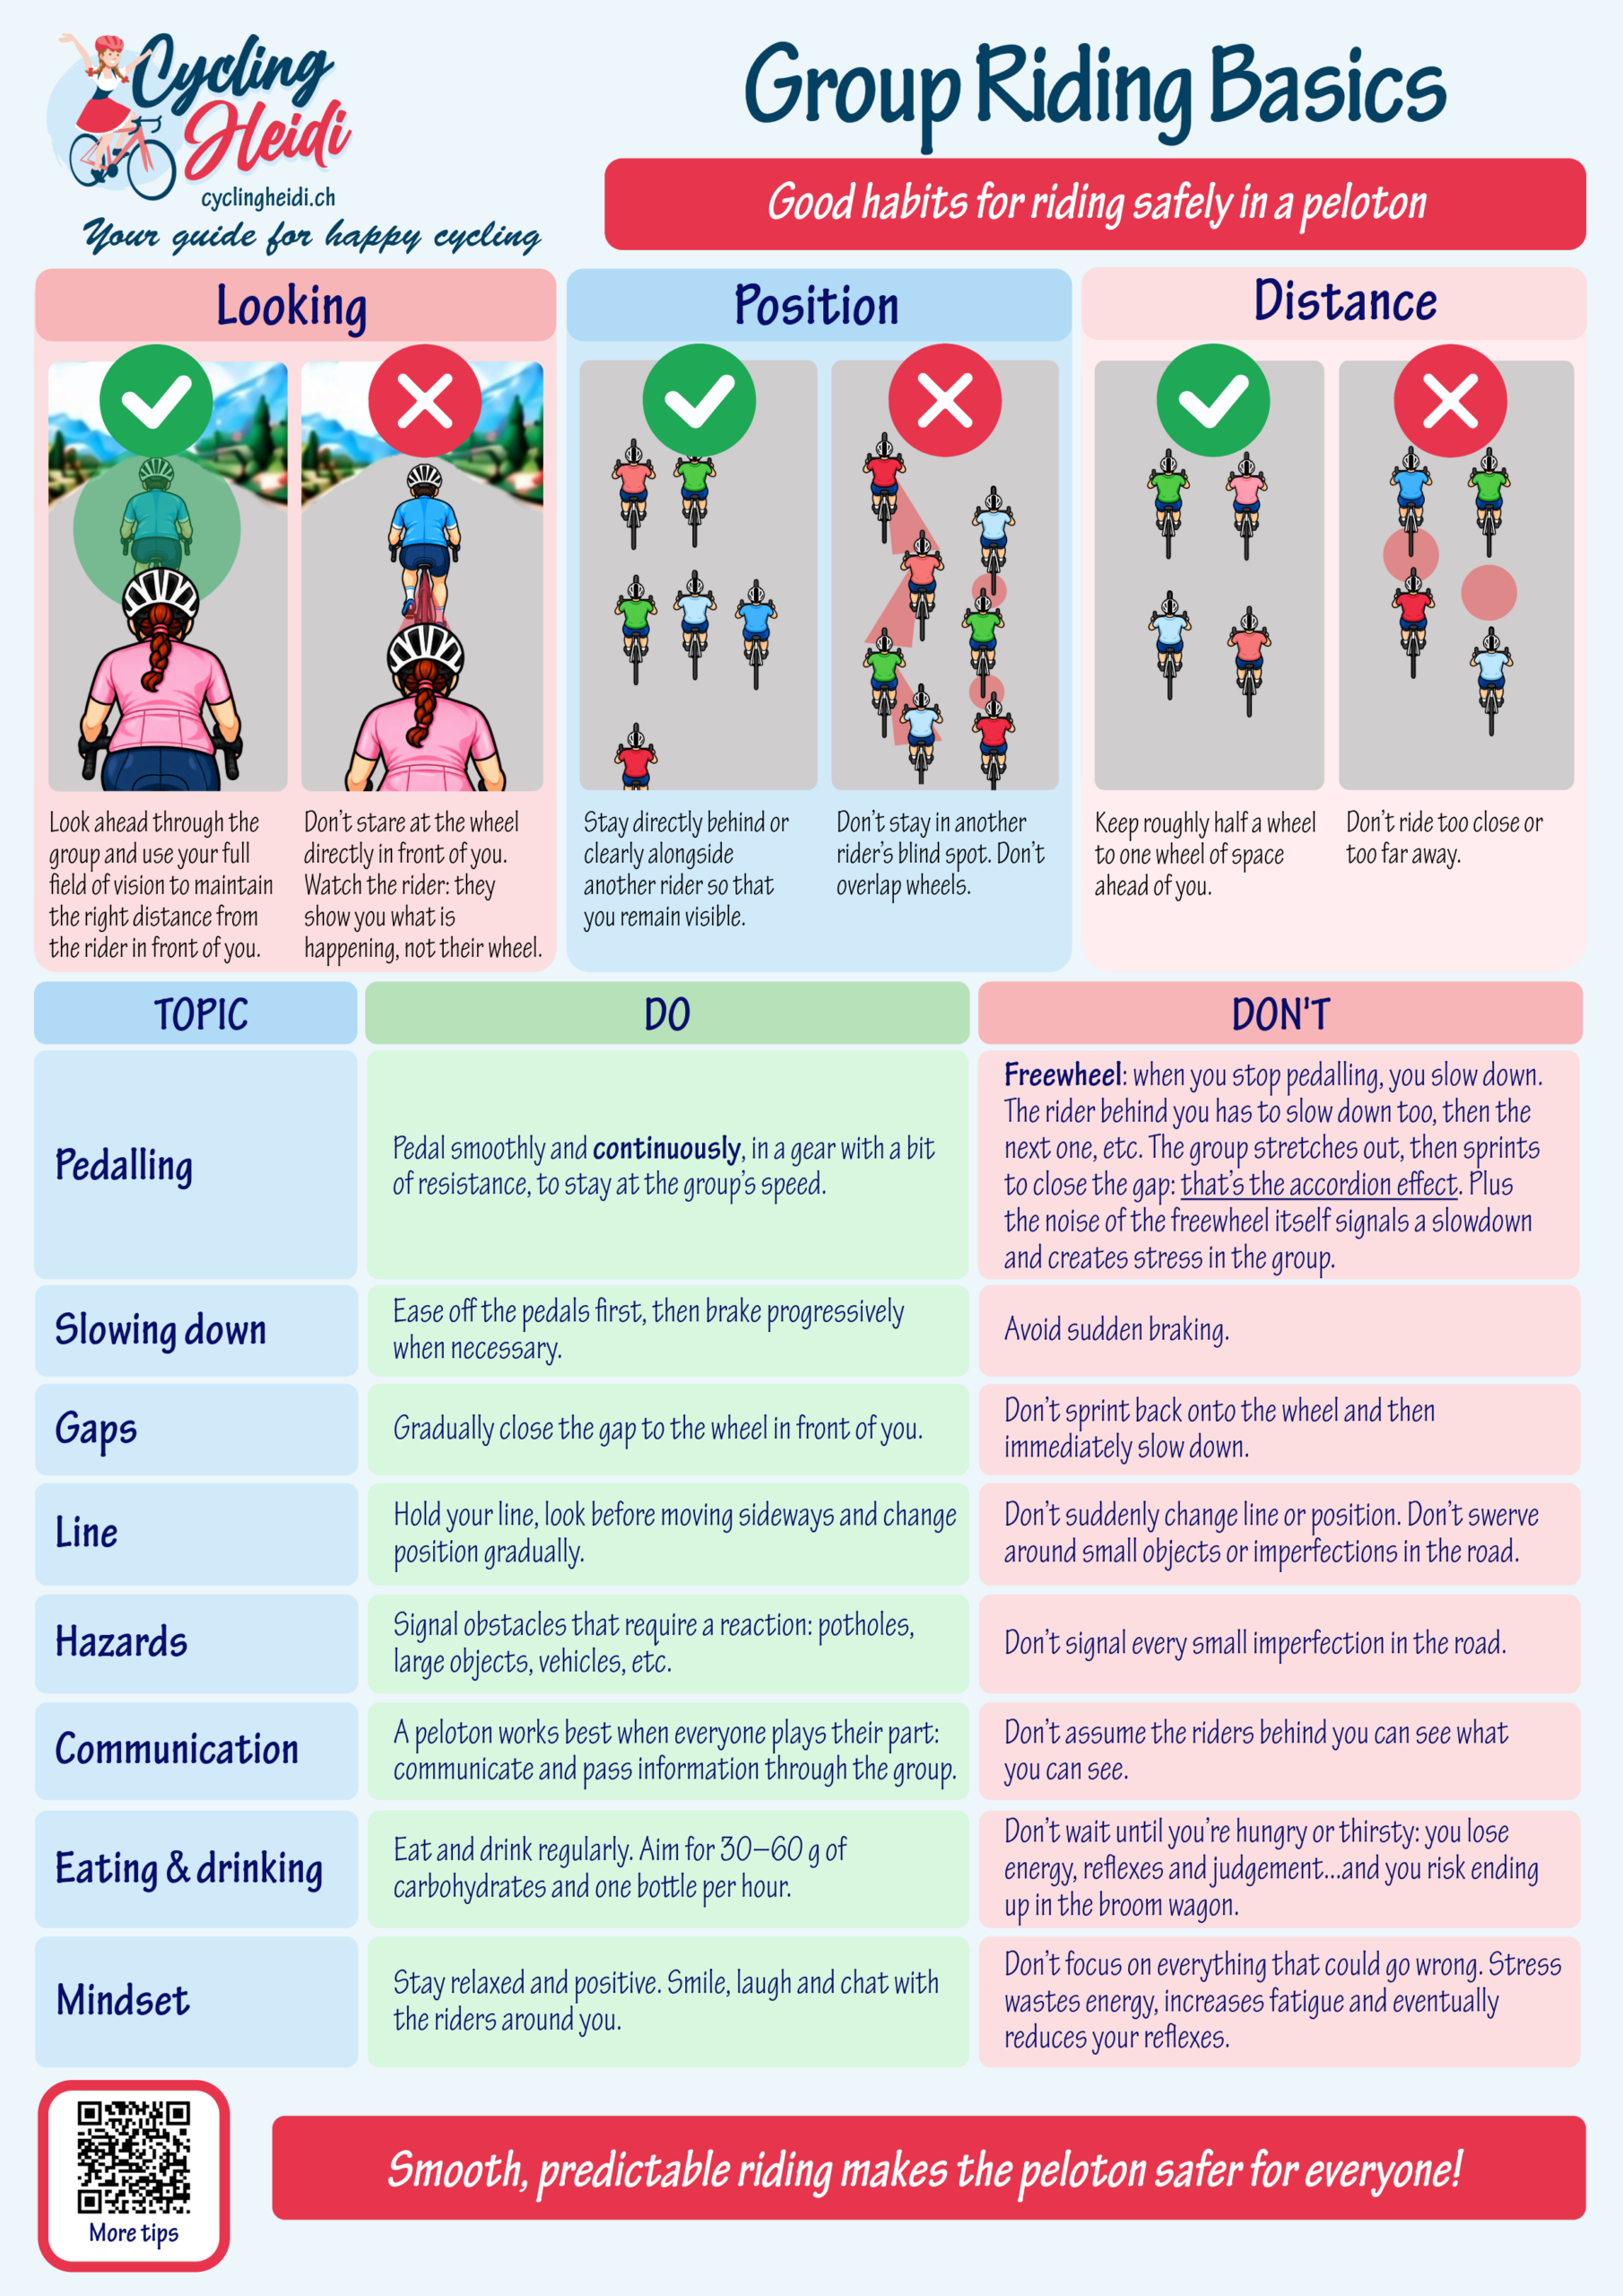
Group riding is a skill you can learn! Whether you ride with friends or in a club, the right reflexes in the peloton can change everything. Smooth, predictable riding makes the outing safer and more enjoyable for everyone!
This table covers the fundamentals: where to look, how to position yourself, keeping the right distance, pedaling smoothly, braking without surprises, communicating with others, and staying relaxed. For every situation, you’ll find what to do and, above all, what to avoid.
No need to memorize it all at once: start with one or two points, put them into practice on your next ride, and you’ll see the difference immediately.
| Topic | DO | DON’T |
|---|---|---|
| Looking | Look ahead through the group and use your full field of vision to maintain the right distance from the rider in front of you. | Don’t stare at the wheel directly in front of you. Watch the rider: they show you what is happening, not their wheel. |
| Position | Stay directly behind or clearly alongside another rider so that you remain visible. | Don’t stay in another rider’s blind spot. Don’t overlap wheels. |
| Distance | Keep roughly half a wheel to one wheel of space ahead of you. | Don’t ride too close or too far away. |
| Pedalling | Pedal smoothly and continuously, in a gear with a bit of resistance, to stay at the group’s speed. | Freewheel: when you stop pedalling, you slow down. The rider behind you has to slow down too, then the next one, etc. The group stretches out, then sprints to close the gap: that’s the accordion effect. Plus the noise of the freewheel itself signals a slowdown and creates stress in the group. |
| Slowing down | Ease off the pedals first, then brake progressively when necessary. | Avoid sudden braking. |
| Gaps | Gradually close the gap to the wheel in front of you. | Don’t sprint back onto the wheel and then immediately slow down. |
| Line | Hold your line, look before moving sideways and change position gradually. | Don’t suddenly change line or position. Don’t swerve around small objects or imperfections in the road. |
| Hazards | Signal obstacles that require a reaction: potholes, large objects, vehicles, etc. | Don’t signal every small imperfection in the road. |
| Communication | A peloton works best when everyone plays their part: communicate and pass information through the group. | Don’t assume the riders behind you can see what you can see. |
| Eating & drinking | Eat and drink regularly. Aim for 30–60 g of carbohydrates and one bottle per hour. | Don’t wait until you’re hungry or thirsty: you lose energy, reflexes and judgement… and you risk ending up in the broom wagon. |
| Mindset | Stay relaxed and positive. Smile, laugh and chat with the riders around you. | Don’t focus on everything that could go wrong. Stress wastes energy, increases fatigue and eventually reduces your reflexes. |
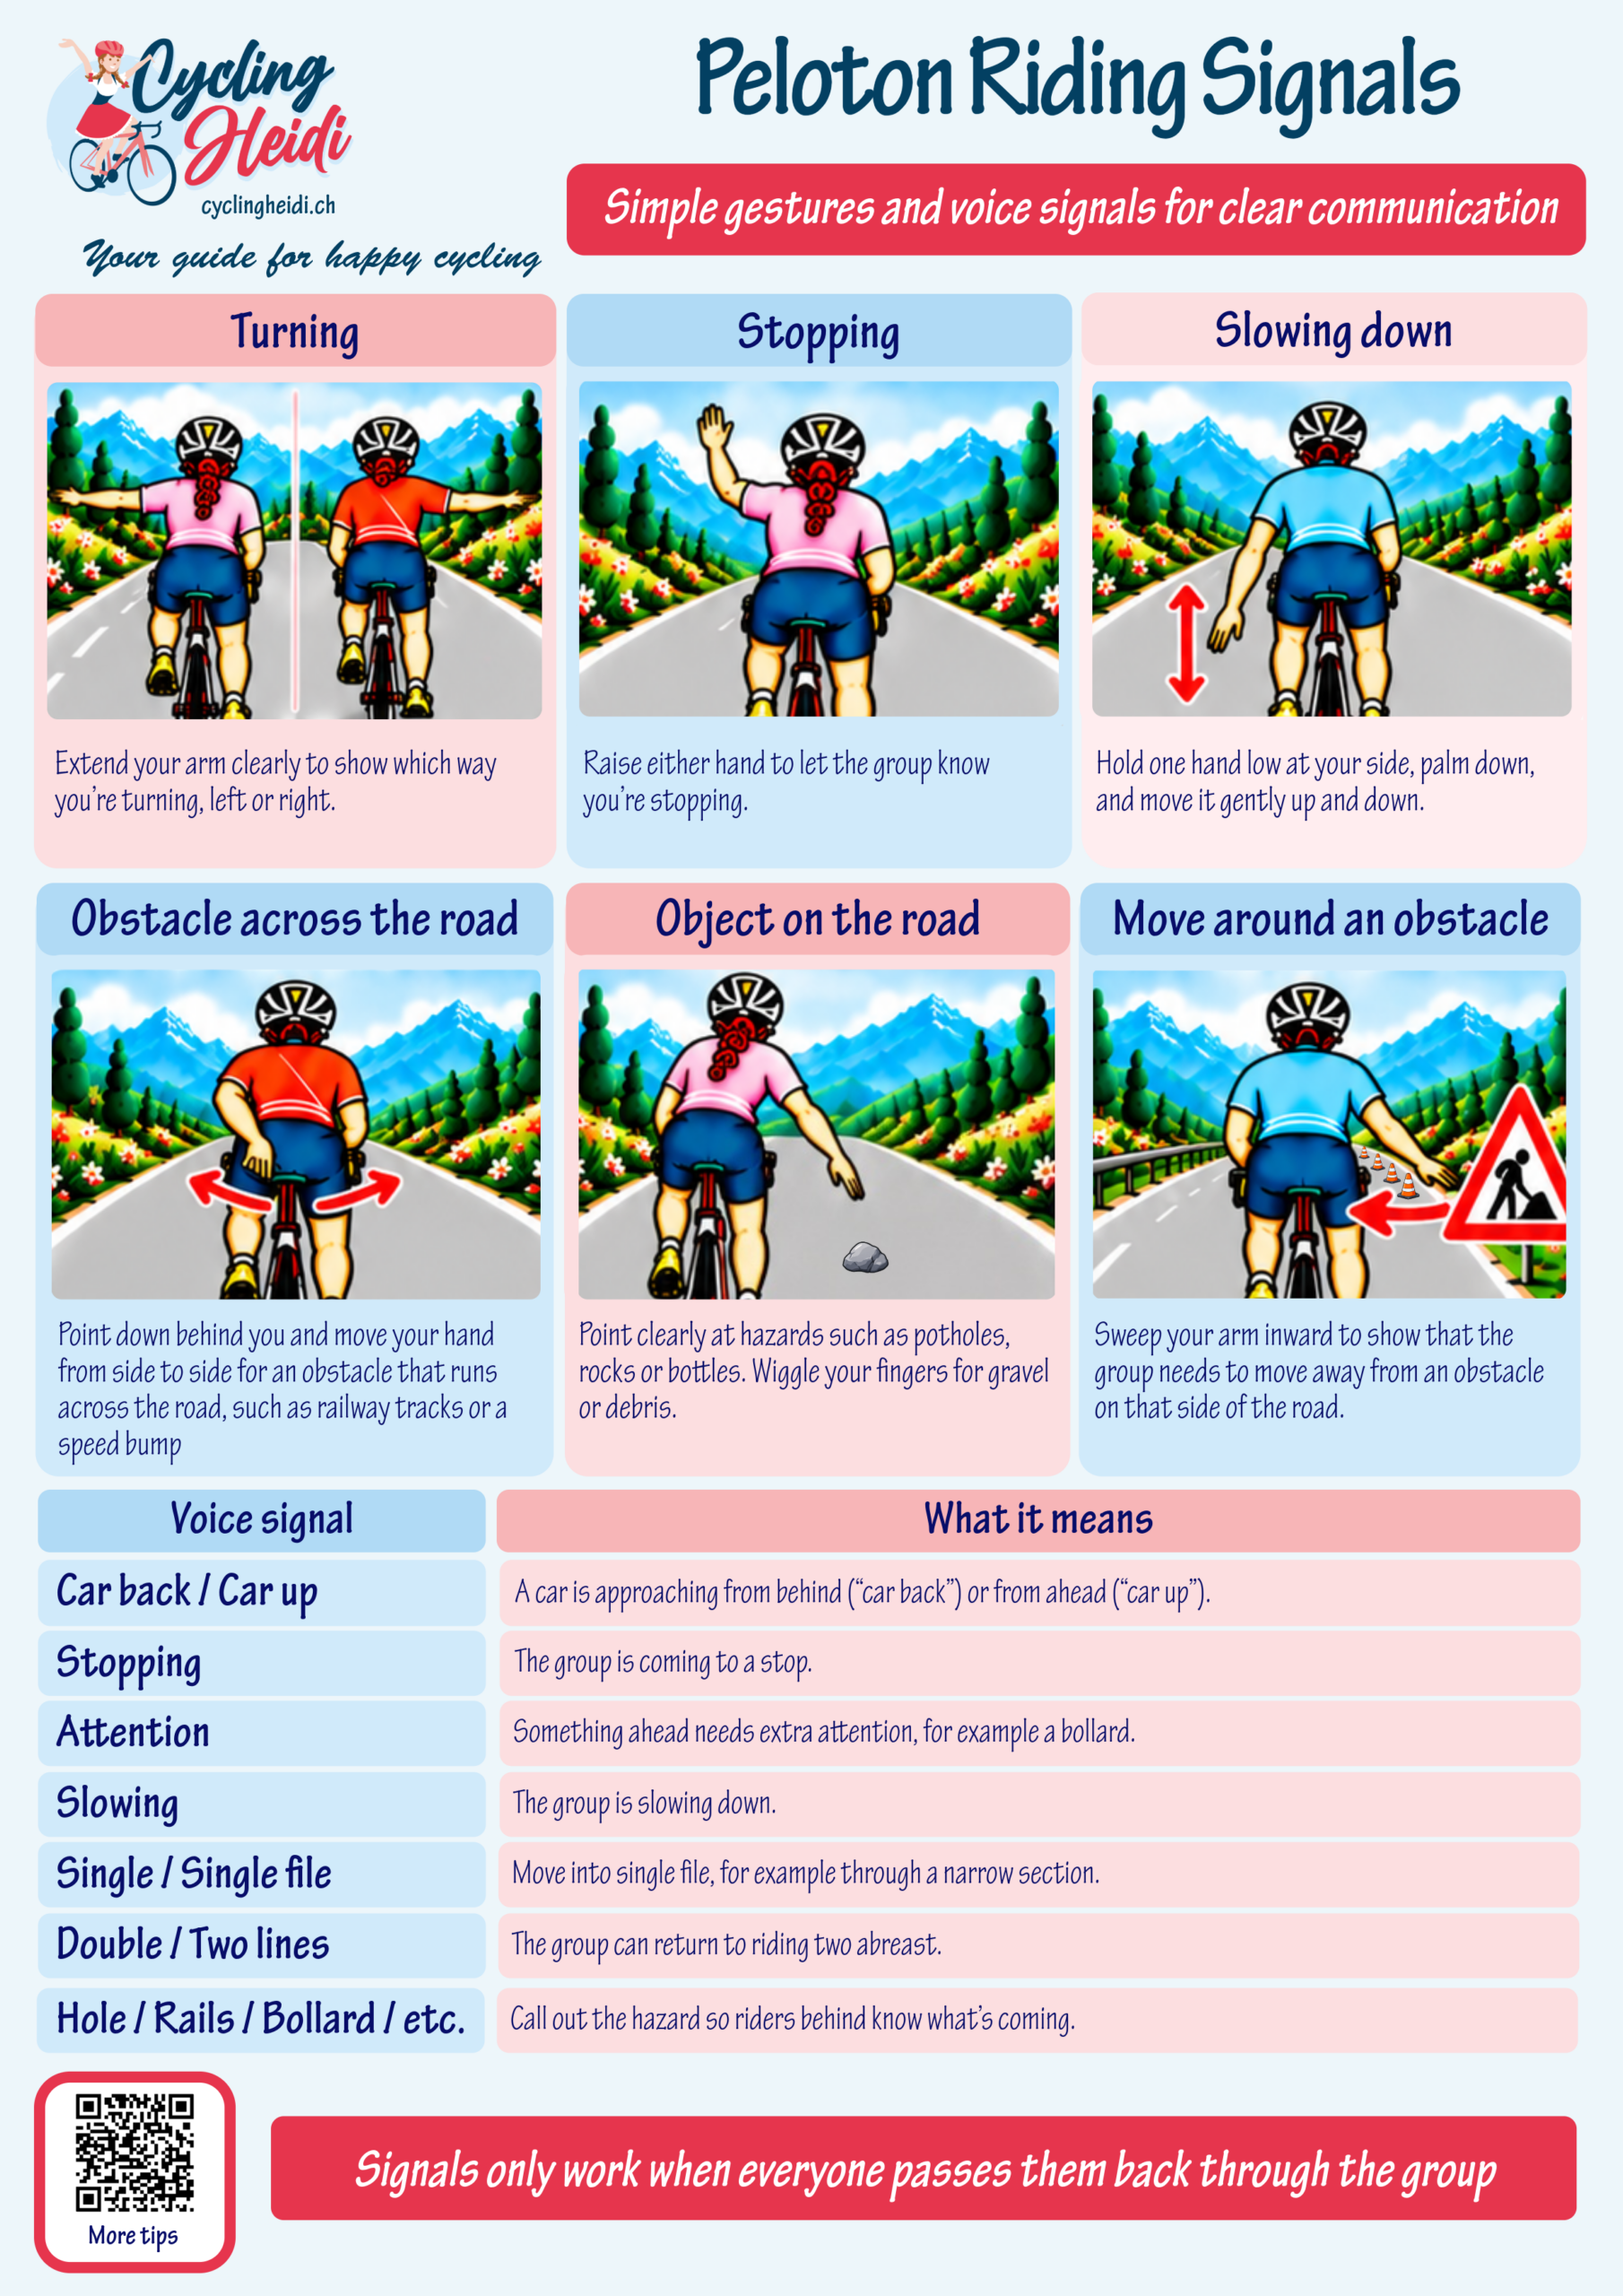
Peloton riding signals
Riding in a group also means speaking the same language. When hands and voice replace turn signals, the ride becomes fluid and safe for everyone.
In this section, you’ll find the essentials of cycling communication: the hand signals for turning, slowing down, or pointing out hazards, plus the key words to call out so information flows from the front to the back of the peloton.
| Signal | The gesture |
|---|---|
| Turning | Extend your arm clearly to show which way you’re turning, left or right. |
| Stopping | Raise either hand to let the group know you’re stopping. |
| Slowing down | Hold one hand low at your side, palm down, and move it gently up and down. |
| Obstacle across the road | Point down behind you and move your hand from side to side for an obstacle that runs across the road, such as railway tracks or a speed bump. |
| Object on the road | Point clearly at hazards such as potholes, rocks or bottles. Wiggle your fingers for gravel or debris. |
| Move around an obstacle | Sweep your arm inward to show that the group needs to move away from an obstacle on that side of the road. |
| Voice signal | What it means |
|---|---|
| Car back / Car up | A car is approaching from behind (“car back”) or from ahead (“car up”). |
| Stopping | The group is coming to a stop. |
| Attention | Something ahead needs extra attention, for example a bollard. |
| Slowing | The group is slowing down. |
| Single / Single file | Move into single file, for example through a narrow section. |
| Double / Two lines | The group can return to riding two abreast. |
| Hole / Rails / Bollard / etc. | Call out the hazard so riders behind know what’s coming. |
Want to improve your skills?
Nothing beats practice on the road. Join me to put these tips into action!
 using WordPress and